STEP 5: Disk Mounting
First, identify the partition START SECTOR
This step only applies to full disk images, not individual partition images - as partition images can be directly mounted since their offset is always 0.
- First identify the specific partition you want to mount
- Multiply the previously identified START SECTOR number by 512 to be used as the Byte Offset to provide to other tools when mounting the specific partition from within the image file/disk device:
echo $((<START_SECTOR>*512))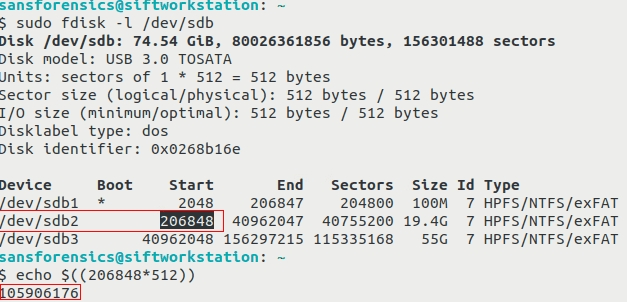
Decrypting Domain-Joined BitLocker Disk Images
- BitLocker encrypted disks must be decrypted prior to being able to mount.
- BitLocker recovery keys for a machine can be retrieved by a Domain Administrator from within Active Directory.
- Login to a machine that is joined to the same domain as the machine that you are decrypting the disk image of, as a Domain Administrator, or user with permissions to view BitLocker recovery keys
- Open an administrative PowerShell Console and execute the following commands to retrieve the BitLocker recovery key for the machine:
$Computer = Get-ADComputer <HOSTNAME>
$ADObject = Get-ADObject -Filter 'objectClass -eq "msFVE-RecoveryInformation"' -SearchBase $Computer.DistinguishedName
$ADObject.'msFVE-RecoveryPassword' - From the SIFT VM, create a folder to expose the decrypted partitions to:
sudo mkdir /mnt/decryptnote- If the image file/block device you are interacting is not that of a single partition (is a full disk with multiple partitions), you will need to specify the offset of the BitLocker encrypted partition within the image by adding
-o <OFFSET>to the arguments of thebdemountcommand. If there are multiple partitions within the BitLocker encrypted image, they will appear as multiple files in/mnt/decrypt/with a sequential number appended to the end of the bde filename.
- If the image file/block device you are interacting is not that of a single partition (is a full disk with multiple partitions), you will need to specify the offset of the BitLocker encrypted partition within the image by adding
- Decrypt the BitLocker image using the SIFT Workstation
bdemounttool to expose the contents in the/mnt/decryptfoldersudo bdemount -r <RECOVERY_KEY> <FILE/DISK> /mnt/decrypt
The E0# file is and EnCase image file format used by EnCase software. The file is used to store digital evidence including volume images, disk image, memory and logical files. Encase creates multiple E0# files of uniform size 640 MB for storing the acquired digital data. The E01 file will automatically account for split E02, E03, etc. files when mounting.
- Mount the
E01file using the SIFTewfmounttool to expose the contents in the/mnt/ewffolder (which is usually the raw logical image of a disk or partition, which still needs to be mounted - again):sudo ewfmount <FILE>.E01 /mnt/ewf - Continue mounting the
/mnt/ewf/*file(s) as a raw image using the other procedures in this SOP
Mounting NTFS Partitions
If the image file/block device you are interacting is not that of a single partition (is a full disk with multiple partitions), you will need to specify the offset of the partition within the image by adding offset=<OFFSET> to the -o arguments of the mount command.
- Create a folder to use as a mount point for the partition:
sudo mkdir <MOUNT_POINT> - Mount the NTFS partition as read-only while exposing Alternate Data Streams and System files:
sudo mount -t ntfs -o loop,ro,noexec,show_sys_files,streams_interface=windows <FILE/DISK> <MOUNT_POINT>
Mounting Most Other Partitions
The mount tool can attempt to identify the filesystem and mount a partition appropriately without the need additional options.
- Create a folder to use as a mount point for the partition:
sudo mkdir <MOUNT_POINT> - Mount the partition as read-only:
sudo mount -o loop,ro,noexec <FILE/DISK> <MOUNT_POINT>
Mounting APFS Partitions
This method requires an internet connection to download the required APFS tools since most non-Mac OS’s do not natively recognize APFS file systems. Execute the following commands from an internet-connected SIFT VM to install the software:
sudo apt-get install libfuse-dev libbz2-dev cmake-curses-gui -y
sudo apt-get install hfsprogs libattr1-dev libicu-dev cmake -y
git clone https://github.com/sgan81/apfs-fuse
mkdir ./apfs-fuse/build
cd ./apfs-fuse/3rdparty/
git clone https://github.com/lzfse/lzfse.git
cd ../build
sudo cmake ..
sudo ccmake . # Set USE_FUSE3 to OFF -> enter c -> enter g
sudo make
sudo chown root:root apfs*
sudo cp apfs* /usr/bin/
If the image file/block device you are interacting is not that of a single partition (is a full disk with multiple partitions), you will need to specify the offset of the partition within the image by adding -o <OFFSET> to the arguments of the losetup command.
- Setup a loop device to be mounted as a block device:
sudo losetup -r <FILE/DISK> - Create a folder to use as a mount point for the partition:
sudo mkdir <MOUNT_POINT> - Mount the loop device as an APFS filesystem:
sudo apfs-fuse /dev/loop# <MOUNT_POINT>